
Automotive Paint Gun Nozzle Size Chart
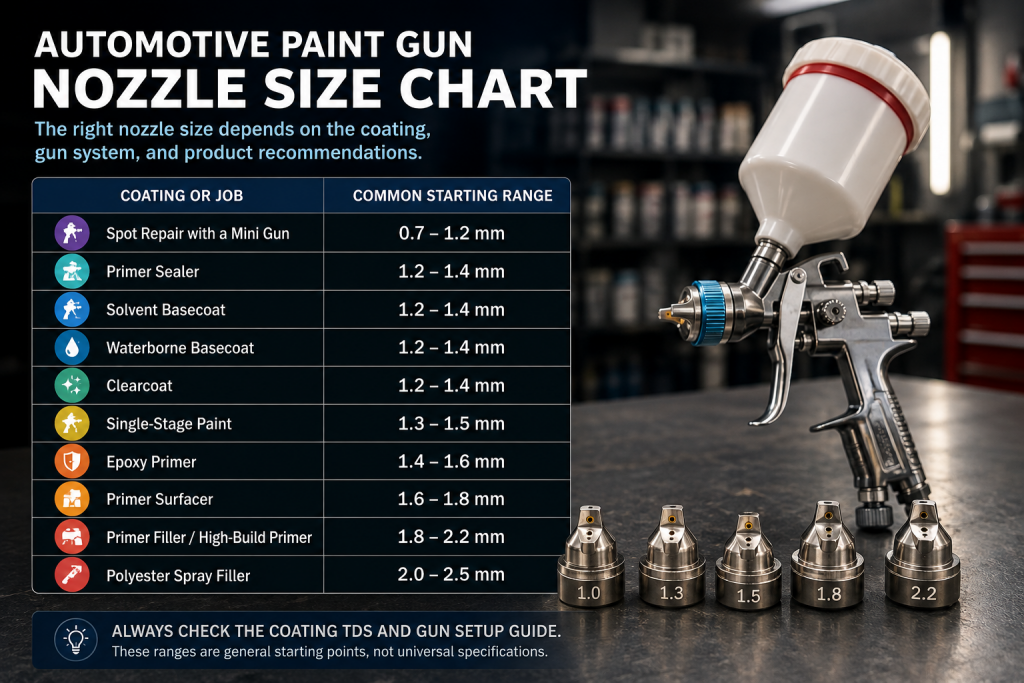
Choosing an automotive paint gun nozzle starts with the coating, not the gun. Common starting ranges are 1.2 to 1.4 mm for most sealers, basecoats, and clearcoats; 1.6 to 1.8 mm for primer surfacer; 1.8 to 2.2 mm for high-build primer or primer filler; and 2.0 to 2.5 mm for polyester spray filler.
Those numbers are a quick reference, not a universal specification. The coating technical data sheet (TDS) should be your first authority. Next, check the setup chart for the exact spray gun and air cap. Use a general nozzle chart only to narrow the options before a spray-out test.
Automotive Paint Gun Nozzle Size Chart
| Coating or job | Common starting range | Setup note |
|---|---|---|
| Spot repair with a mini gun | 0.7 to 1.2 mm | Mini-gun flow and air-cap designs vary. Do not compare the number directly with a full-size gun. |
| Primer sealer | 1.2 to 1.4 mm | Use a smooth, even application. Some products and guns call for a different setup. |
| Solvent basecoat | 1.2 to 1.4 mm | A 1.3 mm setup is a common starting point when the coating and gun maker support it. |
| Waterborne basecoat | 1.2 to 1.4 mm | Check the coating TDS, air movement requirements, and the gun’s waterborne setup chart. |
| Clearcoat | 1.2 to 1.4 mm | Some high-solids clears or gun systems may call for 1.5 mm. Confirm the specific product. |
| Single-stage paint | 1.3 to 1.5 mm | Match material delivery to viscosity, panel size, and the required wet film. |
| Epoxy primer | 1.4 to 1.6 mm | Reduction and whether the primer is being used as a sealer can change the recommendation. |
| Primer surfacer | 1.6 to 1.8 mm | The larger opening supports heavier solids and a sandable film build. |
| Primer filler or high-build primer | 1.8 to 2.2 mm | Follow the TDS closely. A dedicated primer gun is often the practical choice. |
| Polyester spray filler | 2.0 to 2.5 mm | This heavy material needs a large fluid path. Use only a product-approved setup. |
The chart reflects common gravity-feed automotive starting points supported by current spray-gun and coating guidance. For example, 3M’s nozzle reference also warns that the paint manufacturer, coating type, and application can change the recommended size. A pressure-fed, suction-fed, turbine, or mini-gun system may use a different nozzle than the same material in a full-size gravity gun.
What the Nozzle Size Number Means
On an automotive spray gun, a size such as 1.3 mm usually refers to the diameter of the fluid tip opening. That opening affects how much mixed coating can enter the air stream. A larger opening allows more material delivery potential, while a smaller opening provides tighter fluid control.
Nozzle diameter does not work alone. The fluid tip, needle, and air cap are engineered as a system. The needle meters material through the fluid tip, and the air cap shapes and atomizes the stream. If the components are mismatched, worn, or damaged, the gun can leak, produce an uneven fan, or become difficult to adjust.
When changing sizes, use the complete matched set specified for the gun. A replacement tip and needle set is gun-specific, so confirm the part number and compatible air cap before ordering.
Nozzle Size by Automotive Coating
Basecoat
Most solvent and waterborne basecoats start in the 1.2 to 1.4 mm range on a full-size gravity gun. A 1.3 mm setup is common because it balances material delivery with control, especially for metallic and pearl colors. The exact choice still depends on the coating system, mixed viscosity, gun design, air cap, and painter speed.
Metallic orientation problems are not automatically a nozzle-size problem. Air supply, fan adjustment, overlap, reducer speed, panel temperature, gun distance, and pass speed can all change how the color lays down. Verify the TDS and make a spray-out card before committing to the vehicle.
Clearcoat
Clearcoats commonly use 1.2 to 1.4 mm, with 1.3 mm as a frequent middle choice. Some high-solids products and gun combinations may call for 1.4 or 1.5 mm. Others work best with a smaller setup. The goal is enough delivery to form the specified wet film without forcing the painter to slow down excessively or flood the panel.
PPG’s clearcoat application procedure directs painters to the selected clearcoat TDS for the recommended fluid tip. That product-first approach is more reliable than assuming one clearcoat nozzle fits every formula.
Sealer and Single-Stage Paint
Primer sealer often falls near 1.2 to 1.4 mm because it is applied as a smoother, thinner coat than primer surfacer. Single-stage paint commonly starts around 1.3 to 1.5 mm, but viscosity and solids vary widely. Read the product sheet for reduction, film-build, flash-time, and gun-setup requirements.
Epoxy primer deserves special attention. A product sprayed as a reduced sealer may call for a smaller tip than the same family of material used for fuller coverage. Do not collapse sealer and high-build primer into one chart row when planning the job.
Primer Surfacer and High-Build Primer
Primer surfacer generally needs more material flow than basecoat or clearcoat. A 1.6 to 1.8 mm setup is a common starting range. High-build primer and primer filler often move into the 1.8 to 2.2 mm range, while polyester spray filler may require 2.0 to 2.5 mm.
Trying to force a heavy primer through a small topcoat setup can restrict flow, slow film build, and produce a rough pattern. Opening the fluid control, adding unapproved reducer, or raising pressure beyond the gun maker’s instructions is not a substitute for the correct nozzle set.
Spot Repair and Mini Guns
Mini and detail guns commonly use smaller sizes, often 0.7 to 1.2 mm, because the entire gun and air-cap system is designed for lower material flow and a smaller pattern. A 1.0 mm mini gun is not simply a scaled-down version of a 1.0 mm full-size gun.
Use the mini-gun setup chart for the material and repair size. For very small blends, jambs, mirrors, motorcycle parts, or narrow panels, the smaller pattern can reduce masking and overspray. It does not remove the need to meet the coating manufacturer’s film-build and atomization requirements.
1.3 vs. 1.4 Spray Gun Tip: Which Should You Choose?
Neither size is automatically better. On the same gun family, a 1.3 mm setup generally offers lower material delivery and finer control. A 1.4 mm setup generally moves more material and can help a faster painter maintain a wet edge. Air-cap design can make two guns with the same nominal size behave differently.
Choose 1.3 mm when the coating and gun maker recommend it, you want controlled basecoat delivery, or the material atomizes cleanly without forcing a slow pass. Choose 1.4 mm when the approved setup calls for more flow, the clear or single-stage material needs it, or the panel size and painter speed favor a wetter delivery.
If both sizes are approved, compare them on a test panel with the same mixed material, air supply, pressure, fan setting, distance, overlap, and pass speed. The better choice is the one that produces the required film and pattern with normal adjustments, not the one with the more popular number.
Can One Spray Gun Handle Primer, Basecoat, and Clearcoat?
One gun body can sometimes handle several materials if the manufacturer offers compatible matched nozzle sets and the gun is cleaned thoroughly between products. The practical limitation is that heavy primer and finish coats usually need different fluid setups. Contamination from primer or basecoat can also ruin a clearcoat finish.
For many garages and small shops, two guns are a useful working setup:
- A finish gun with a 1.3 or 1.4 mm set for approved sealers, basecoats, clearcoats, and single-stage materials.
- A primer gun with a larger set, often 1.8 mm or another size specified by the primer TDS.
Production shops may add a dedicated clearcoat gun to reduce contamination risk and keep each gun adjusted for a repeatable task. A multi-nozzle kit can be cost-effective, but every size change must use compatible components and a complete cleaning process.
Does HVLP vs. LVLP Change the Nozzle Size?
The material range may look similar, but the correct setup is specific to the gun. HVLP, LVLP, compliant, high-transfer-efficiency, turbine, pressure-feed, suction-feed, full-size, and mini guns do not necessarily behave the same with an identical 1.3 mm marking.
Do not apply a single pressure number to every HVLP gun. The 10 psi figure often associated with HVLP refers to pressure at the air cap, not necessarily the inlet gauge. Required inlet pressure and air consumption vary by gun and cap. Set pressure where the manufacturer specifies, usually with the trigger fully pulled, and confirm that the compressor, hose, couplers, regulator, and filters can supply the required CFM without a large pressure drop.
If the fan collapses or atomization becomes coarse during a pass, the problem may be restricted air delivery rather than the fluid tip. Check the gun’s air-consumption specification against the compressor’s delivered CFM, not only the tank pressure or peak PSI printed on the compressor.
A Reliable Nozzle Selection Process
- Identify the exact coating and how it will be used. Sealer, surfacer, high-build primer, basecoat, clearcoat, and single-stage paint need different film behavior.
- Read the mixed-product TDS. Note the recommended gun type, fluid tip, reduction, pressure guidance, flash time, and film build.
- Check the spray-gun setup chart. Confirm the nozzle set, air cap, feed type, and air-consumption requirement.
- Install a matched and clean needle, fluid tip, and air cap. Inspect sealing surfaces and air-cap holes for damage or residue.
- Mix and strain the coating exactly as directed. Select the reducer or activator for the approved temperature range.
- Set air pressure using the gun maker’s procedure and verify airflow with the trigger pulled.
- Test the fan on masking paper, then make a spray-out panel. Look for an even, balanced pattern and the required film build.
- Adjust one variable at a time. Record the setup that works so the next job starts from a repeatable baseline.
Troubleshooting Nozzle-Related Spray Problems
| Symptom | Nozzle-related possibility | Check before changing the nozzle |
|---|---|---|
| Weak flow, sputtering, or slow primer build | Fluid tip may be too small for the mixed material | TDS, reduction, strainer, blocked passages, venting, fluid adjustment, and material temperature |
| Heavy wet film, runs, or sags | Tip may be larger than the material and painter speed can support | Fluid control, pass speed, distance, overlap, reducer speed, and target film build |
| Dry or coarse finish | Material may not be flowing or atomizing through the selected setup | Air supply, inlet pressure under trigger, viscosity, reducer, temperature, gun distance, and air-cap cleanliness |
| Orange peel | Tip choice may contribute to poor delivery or atomization | Air volume, pressure, viscosity, reducer speed, panel temperature, pass speed, and film build |
| Metallic mottling or striping | Material delivery may be too heavy or inconsistent | Fan balance, overlap, pressure, distance, pass speed, flash, and the coating maker’s orientation technique |
| Uneven or distorted fan | Nozzle set may be dirty, damaged, worn, or mismatched | Clean the air-cap holes and fluid path, inspect components, and verify part compatibility |
A spray defect rarely proves that the nozzle is wrong by itself. Use the pattern and film as clues, then work through the approved setup rather than making several compensating adjustments at once.
Cleaning and Nozzle Set Care
Clean the gun after every material according to the coating and gun manufacturers’ instructions. Remove residue with approved brushes and cleaning tools. Do not probe precision air-cap holes or the fluid tip with hard objects that can enlarge or distort them.
Inspect the needle, fluid tip, seals, and air cap for wear, scoring, bent points, and damaged holes. When the gun maker specifies a matched replacement, replace the set together. Gradual wear can increase fluid delivery and make a previously repeatable adjustment feel unpredictable.
For a complete setup, National Tool Warehouse carries automotive spray equipment, including spray guns, kits, repair components, air-adjusting valves, spray gun cups, and cleaning accessories. Match every part to the gun model and coating requirements before spraying.
Frequently Asked Questions
What is the best all-around nozzle size for automotive paint?
A 1.3 or 1.4 mm setup is a common starting point for many approved basecoat, clearcoat, sealer, and single-stage applications on a full-size gravity gun. It is not a good universal choice for heavy primer. Check the coating TDS and gun chart before selecting either size.
What nozzle size should I use for 2K or high-build primer?
Primer surfacer commonly starts around 1.6 to 1.8 mm. High-build primer or primer filler often starts around 1.8 to 2.2 mm. Polyester spray filler may need 2.0 to 2.5 mm. The product TDS is the deciding source.
Is a 1.3 or 1.4 tip better for clearcoat?
Both can be correct. A 1.3 mm setup generally gives tighter fluid control, while a 1.4 mm setup generally delivers more material on the same gun family. Clearcoat solids, gun and air-cap design, panel size, reducer speed, and painter technique determine which approved option works better.
Can I spray primer with a 1.4 mm tip?
Some sealers and epoxy primers specify a 1.4 mm setup. A high-build primer usually needs a larger fluid path. Do not use the word “primer” alone to choose the tip. Identify the exact product and application, then follow its TDS.
Do I need to change the needle and air cap when I change nozzle size?
Use the complete matched components specified by the gun manufacturer. Depending on the gun, the approved set may include the fluid tip, needle, and air cap. Mixing sizes or parts from different sets can cause leakage, poor adjustment, or an uneven pattern.
Can the wrong nozzle size cause orange peel?
It can contribute, but orange peel also results from air supply, pressure, viscosity, reducer speed, temperature, distance, pass speed, and film build. Confirm the full setup before blaming the tip alone.
Are HVLP and LVLP nozzle sizes interchangeable?
Not automatically. The same nominal diameter can perform differently across gun and air-cap designs. Use the setup chart for the exact gun, coating, and feed system.