
How a Rivet Works: Parts, Types and Installation
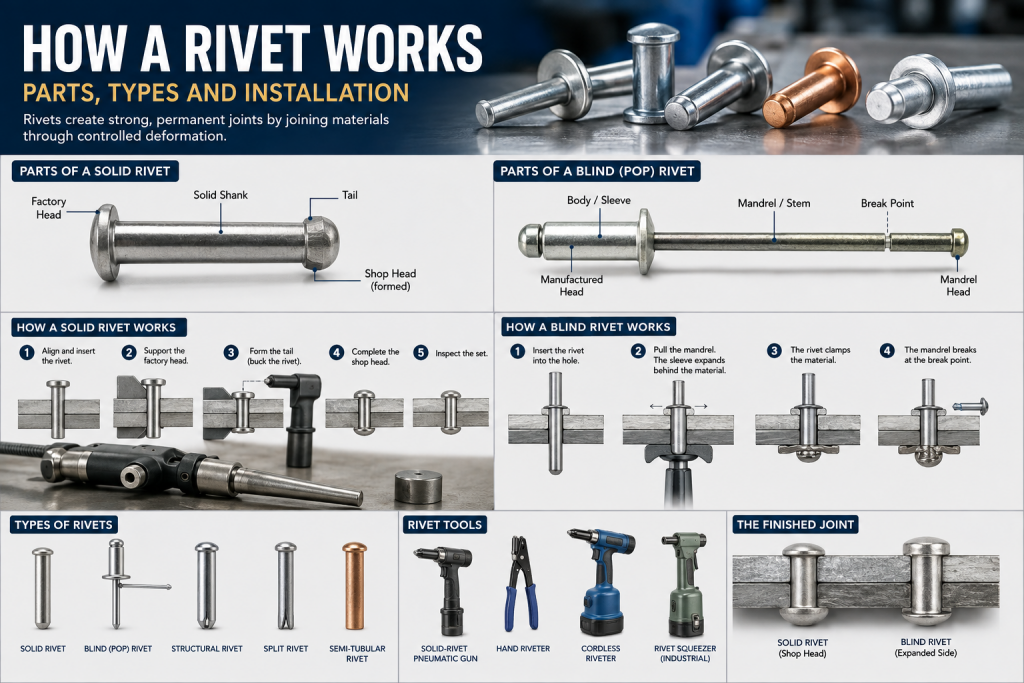
A rivet is an unthreaded fastener that joins two or more pieces by passing through aligned holes and being permanently deformed. This deformation creates a second retaining surface, holding the material between it and the rivet’s manufactured head. Solid and blind rivets follow the same basic principle, but form the second surface differently.
For other panel-repair equipment, see our auto body tools guide. If you are considering a pneumatic riveter, our air-system sizing checks explain which model specifications to compare with your compressor.
This guide covers rivet anatomy, solid and blind mechanisms, selection, tools, installation, inspection and removal.
In short: A rivet passes through aligned material and is permanently deformed so the stack is retained between its manufactured head and a formed head or expanded blind side. Solid rivets are bucked from the rear, while blind rivets use a pulled mandrel.
What Is a Rivet?
A rivet is a fastener designed to remain in a joint until it is drilled out or otherwise destroyed during removal. Unlike a screw or bolt, a conventional rivet does not depend on mating threads.
The preformed end is the factory head or manufactured head. The shank or body passes through the workpieces. Installation reshapes the opposite end to create another retaining surface.
“Permanent” describes the fastening method, not the strength of every rivet. The fastener must still suit the material thickness, hole, environment, load direction and requirements of the joint.
What Are the Parts of a Rivet?
The parts depend on whether the fastener is a solid rivet or a blind rivet. One frequent source of confusion is the mandrel. Blind rivets usually have one, but solid rivets do not.
Parts of a Solid Rivet
- Factory head: The manufactured head that remains against one side of the work.
- Solid shank: The unthreaded body that passes through the aligned holes.
- Tail: The projecting end that is deformed during installation.
- Shop head: The second head formed from the tail during setting.
The completed joint retains the work between the factory head and the shop head.
Parts of a Blind or Pop Rivet
- Body or sleeve: The hollow portion inserted into the hole.
- Manufactured head: The flange resting against the accessible surface.
- Mandrel or stem: The central member pulled by the setting tool.
- Mandrel head: The enlarged end acting against the sleeve.
- Break point: The designed location where the mandrel separates.
“Pop rivet” is commonly used for this fastener, although “blind rivet” is the broader generic term.
How Does a Rivet Work?
Every conventional rivet works through controlled deformation. The rivet enters aligned holes, then its end or body changes shape so the material cannot slide off. The result is a retaining surface on each side of the stack.
How a Solid Rivet Works
Solid riveting normally requires access to both sides of the joint.
- Align and insert. Align the holes and insert the shank until the factory head rests against the material.
- Support the head. Support the factory head while force is applied to the projecting tail.
- Form the tail. Use a solid-rivet pneumatic rivet gun and bucking bar, a rivet squeezer, a press or another specified method to deform the tail.
- Complete the shop head. Continue until the tail forms the required shop head.
- Inspect the set. Check the head and surrounding material against the applicable acceptance criteria.
A solid-rivet pneumatic rivet gun delivers impacts to form the tail. It is different from a blind or pull riveter, which grips and pulls a mandrel.
How a Blind Rivet Works
A blind rivet is designed for one-sided installation. Rear tool access is not required, but space behind the work can still matter. Some products need blind-side clearance for the body to expand without striking an obstruction.
After the body enters the hole, a blind or pull riveter grips the mandrel and pulls it toward the operator. The mandrel head acts against the far end of the sleeve, causing the sleeve to expand or form a bulb behind the work.
This expansion develops the second retaining surface and applies clamp across the material stack. The mandrel eventually separates at its designed break point. The precise expansion pattern and retained-stem behavior depend on the product.
A snapped mandrel does not by itself prove that the rivet is correctly set. Hole condition, grip range, tool setup, seating and the finished blind-side formation can still be wrong.
What Holds the Joint Together?
A set rivet has a retaining surface on each side of the material. The factory head provides one surface, while the shop head or expanded blind side provides the other. The installation process also develops clamp across the stack.
A shear load tries to slide the joined pieces across one another, placing force across the shank. A tensile load pulls the pieces apart along the fastener’s axis.
Rivet design, material, diameter, hole condition, spacing and joint construction affect performance. For structural, load-rated or safety-critical work, follow the applicable engineering specification, repair procedure and manufacturer data.
Common Types of Rivets and Where They Are Used
Choose a rivet based on access, material thickness, environment and the requirements of the joint.
| Rivet type and access | Installation tool | Common uses and considerations |
|---|---|---|
| Solid rivet, normally two-sided access | Solid-rivet gun and bucking bar, squeezer or press | Fabricated assemblies and specified sheet-metal repairs; shop-head formation must meet governing requirements |
| Standard blind or pop rivet, one-sided installation | Blind or pull riveter | Enclosures, panels, ducts and general repairs; match grip range and hole size to product data |
| Structural blind rivet, one-sided installation | Manufacturer-approved compatible riveter | A defined product class for specified performance; a standard blind rivet is not automatically interchangeable |
| Closed-end or sealed blind rivet, one-sided installation | Compatible blind or pull riveter | Published sealing characteristics may be useful; sealing depends on the complete joint and correct installation |
| Drive rivet, access varies by design | Hammer or specified driver | Signs, trim and light fastening; confirm service and removal needs |
| Tubular or semi-tubular rivet, usually two-sided access | Press, squeezer or setting machine | Hinges, handles and manufactured assemblies; tooling depends on the tail design |
| Plastic or push rivet, often one-sided installation | Hand pressure or trim tool | Automotive trim, guards and light panels; verify hole size and panel thickness |
A rivet nut is a threaded insert rather than a conventional rivet. It creates reusable internal threads in thin material and requires a compatible rivet-nut setter.
Browse riveting tools and fasteners after identifying the fastener design and capacity the job requires.
How to Choose the Right Rivet
Begin with the joint, not the tool already on the bench.
Match Diameter, Grip Range and Hole Size
Grip range is the total thickness a rivet is designed to join. Add the thicknesses of all layers, then select a rivet whose published grip range includes that total.
Grip range is not the same as body diameter. Diameter describes the width of the body, while grip range describes the material thickness it can fasten.
The prepared hole must fall within the manufacturer’s specified range. An oversized or damaged hole can allow movement or poor formation. A hole that is too small can prevent insertion or damage the work. Avoid universal sizing formulas because requirements vary by fastener design and application.
Choose Compatible Materials
Rivets are available in aluminum, steel, stainless steel, copper, plastic and mixed-component constructions. Selection depends on the required performance, exposure, weight, appearance and workpiece materials.
Dissimilar metals can create galvanic-corrosion risk when electrical contact and a suitable electrolyte are present. Risk depends on the metal pairing, coatings, environment and joint design. For damp, outdoor, marine or chemical exposure, check published compatibility and corrosion guidance.
Select the Head Style
Head style affects how force is distributed on the accessible surface.
- Dome heads: Common general-purpose choices.
- Large-flange heads: Distribute force over a wider area and may help support thin or soft material when the application permits.
- Countersunk heads: Can provide a flush surface, but require a suitable countersink and enough material for the specified design.
Before ordering, confirm access, blind-side clearance, total grip, diameter, hole size, materials, environment, head style, tool capacity and any governing specification.
Which Rivet Tool Should You Use?
A hand-operated blind or pull riveter is portable and useful for occasional work within its rated capacity. A long-handle model provides more leverage for compatible fasteners. Pneumatic, air-hydraulic and cordless pull riveters can reduce effort during repetitive work.
Solid rivets use different equipment. Depending on the job, installation may require a solid-rivet pneumatic rivet gun with a bucking bar, a squeezer or a press. Rivet nuts need a compatible threaded-insert setter.
Match the tool and nosepiece to the rivet diameter, material and mandrel. Before changing a nosepiece or clearing a jam, isolate the air supply or remove the battery according to the manufacturer’s instructions. Keep your face and bystanders clear of ejected stems, and use the stem collector when the tool is equipped with one.
Compare rivet guns and riveters by fastener capacity, tool type, access and work volume. For pneumatic shop setups, National Tool Warehouse also has practical air tools resources.
How to Install a Blind Rivet
Follow the rivet and tool manufacturers’ instructions. Wear eye protection, control loose clothing and use hearing protection when the environment requires it. Shop safety and protective gear can help prepare a suitable work area.
- Confirm the specifications. Check rivet diameter, grip range, hole requirement, material, clearance and tool capacity.
- Secure the work. Align and clamp the pieces so they cannot shift.
- Prepare the hole. Use the specified bit size and drill square to the surface. Appropriate drill bits help produce a controlled hole.
- Deburr and clean. Remove burrs and chips without enlarging the hole.
- Seat the rivet. Insert the body fully so the manufactured head rests against the work.
- Set up the tool. Fit the correct nosepiece while the tool is isolated, then load the mandrel and hold the riveter square.
- Operate the riveter. Keep your face and bystanders outside the possible stem path. Pull until the designed break occurs, using the collector where fitted.
- Inspect the joint. Do not accept the installation based only on the snapping sound or broken mandrel.
Stop if the tool stalls, the rivet shifts or the installation behaves differently from the product instructions.
How to Tell Whether a Rivet Is Set Correctly
The manufactured head should be seated as specified, the joined pieces should not move, and the shop head or blind-side formation should meet the applicable acceptance guidance.
| Symptom | Possible causes | What to check |
|---|---|---|
| Head remains above the surface | Burrs, misalignment or incomplete seating | Hole condition, clamping and head contact |
| Rivet spins or joint remains loose | Oversized hole, wrong grip range or incomplete setting | Hole diameter, stack thickness and tool stroke |
| Mandrel breaks early or does not break | Wrong nosepiece, damaged rivet, tool capacity issue or incorrect grip | Tool setup, product instructions and rivet selection |
| Material puckers or cracks | Poor support, unsuitable head or excessive deformation | Material condition, backing and head style |
| Head pulls through | Hole, material or head is unsuitable | Manufacturer guidance and joint design |
| Stem projects or creates a hazard | Incomplete set or product-specific retained-stem condition | Acceptance criteria and installation instructions |
A broken mandrel is one event in the setting process, not a complete inspection. Stop and investigate repeated failures before installing another rivet into the same hole.
Rivets vs. Screws, Bolts and Welding
No joining method is best for every application.
| Method | Access and service | Key considerations |
|---|---|---|
| Rivet | Solid types normally need both sides; blind types install from one side; removal destroys the rivet | Fast installation with no threads to tighten; performance depends on rivet and joint design |
| Screw or bolt | Screws may install from one side; a conventional bolt and nut usually need both; generally removable | Useful where later service is expected and the receiving threads or nut remain accessible |
| Welding | Access depends on the process; not readily removable | Adds heat and requires compatible material, preparation, equipment and operator skill |
Vibration behavior, strength and inspection needs depend on the actual fastener, weld process and joint. Compare specifications for the intended application instead of declaring one method universally superior.
How to Remove a Rivet
Wear eye protection, secure the work and use an approved procedure where the assembly is structural or safety-critical.
Mark the center of the rivet head. Drill only far enough to separate the head from the body, taking care not to enlarge the original hole. Remove the loose head, then use a suitable punch to drive the remaining body through. Support the surrounding material and inspect the hole and finish before selecting a replacement.
For automotive panel work, see National Tool Warehouse’s paint and body tool guides and body shop tools overview.
Frequently Asked Questions
Do all rivets require access to both sides?
No. Solid rivets normally require access to both sides for supporting and forming the tail. Blind rivets install from one accessible side, although clearance behind the work may still be necessary for the rivet body to expand properly.
Are pop rivets and blind rivets the same?
In common workshop use, “pop rivet” usually means a blind rivet installed by pulling a mandrel. Blind rivet is the broader generic term, and different blind-rivet designs can have different setting, retention and performance characteristics.
Why does the mandrel snap?
A blind rivet mandrel has a designed break point. It separates after the setting sequence reaches the product’s intended stage. The break alone does not confirm a good installation, so the head, joint and blind-side formation still require inspection.
What size rivet do I need?
Use the manufacturer’s chart to select a body diameter and grip range for the total material thickness, specified hole and application requirements. No single sizing formula safely covers every rivet design, material and joint.
Are rivets waterproof?
Standard open blind rivets are not inherently watertight. Some closed-end or sealed products may provide published sealing performance when the complete joint is correctly specified, prepared and installed. Confirm product data before relying on a riveted joint to exclude water.
Once the rivet specification is confirmed, compare rivet guns and riveters by capacity, power source and expected workload, or review the broader selection of riveting tools and fasteners.