
Body Filler vs Bondo: Differences, Uses, and How to Choose
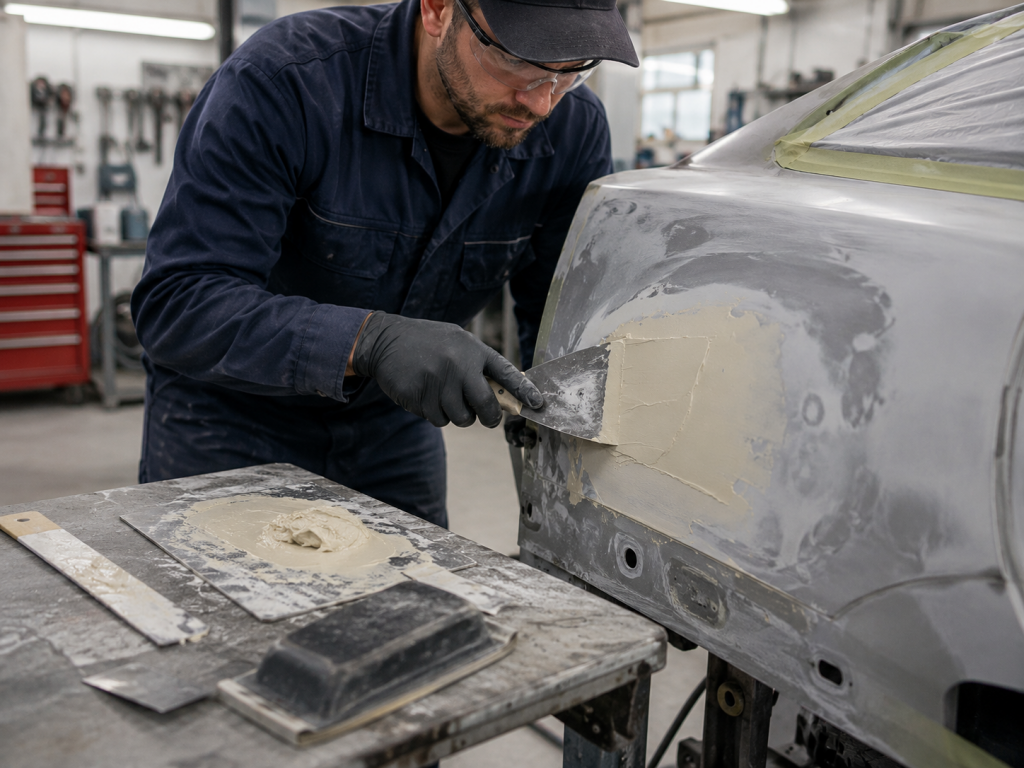
When repairing dents, scratches, low spots, or damaged vehicle panels, you may hear the terms body filler and Bondo used interchangeably. That often leads people to assume they are two entirely different materials.
For the next stages of refinishing, compare paint-gun nozzle sizes. For joints that require sealing rather than cosmetic filling, use our separate sealing-adhesives guide and the specified product instructions.
The main distinction is simple: body filler is a broad category of automotive repair compounds, while Bondo is a specific brand that sells body filler and related repair products.
In everyday conversation, many people use “Bondo” as a general term for automotive body filler. However, not every body filler is made by Bondo, and not every product sold under the Bondo name is designed for the same type of repair.
Choosing the right material depends on the surface being repaired, the depth of the damage, the amount of flexibility required, and the type of finish you want to achieve. Proper surface preparation, mixing, application, and sanding are also just as important as the brand you select.
Is Bondo the Same as Body Filler?
Bondo is a type and brand of body filler, but the terms do not technically mean the same thing.
Automotive body filler is a general name for compounds used to level dents, low areas, scratches, pinholes, and other surface imperfections. These products are commonly applied after the underlying panel damage has been corrected as much as possible.
Bondo is one of the most recognizable brands in this category. Its popularity has caused the brand name to become a generic term in the same way that people sometimes use a well-known brand name to describe an entire product category.
The important point is that you should compare the specific product formula and intended use, not simply the name on the container.
| Feature | Body Filler | Bondo |
| Meaning | General category of repair compounds | A specific brand |
| Typical use | Filling dents, low spots, scratches, and imperfections | Depends on the particular Bondo product |
| Available formulas | Standard, lightweight, reinforced, glazing, and fiberglass | Multiple branded formulas |
| Best choice | Depends on the repair | Depends on the selected product |
What Is Automotive Body Filler?
Automotive body filler is a repair compound used to restore the shape and smoothness of a damaged panel.
Traditional body filler generally consists of a polyester resin base that is combined with a separate hardener. When the two components are mixed, a chemical reaction begins and the filler starts to cure.
Once cured, the material can be shaped and sanded to create a smooth transition between the repaired area and the surrounding panel.
Common uses include:
- Leveling shallow dents
- Filling low areas after metal straightening
- Correcting minor surface imperfections
- Smoothing repaired fiberglass components
- Refining a panel before priming and painting
- Filling small scratches or pinholes with a suitable finishing product
Body filler is not intended to replace proper structural repair. The damaged metal should first be reshaped, repaired, or replaced as needed. The filler should then be used to refine the surface rather than rebuild the entire panel.
Because formulas differ, always check the manufacturer’s instructions for compatible surfaces, mixing ratios, working time, curing time, and maximum recommended thickness.
What Is Bondo?
Bondo is a well-known automotive repair brand that offers body fillers and related repair materials.
The name is frequently used to describe any body filler, but Bondo-branded products can include different formulations intended for different tasks. One product may be designed for ordinary dents, while another may be intended for fiberglass work, glazing, reinforced repairs, or smaller surface imperfections.
That means it is not enough to ask whether Bondo is better than body filler. A more useful question is:
Which specific filler formula is best suited to the repair?
A general-purpose filler, lightweight filler, fiberglass-reinforced compound, metal-reinforced filler, and glazing putty all serve different purposes. The correct choice should be based on the damage and surface rather than brand recognition alone.
Body Filler vs Bondo: Main Differences
Brand name versus product category
The most important difference is terminology.
Body filler describes the overall category. Bondo is one brand within that category.
Therefore, a comparison between “body filler vs Bondo” is similar to comparing a product type with one manufacturer that sells that product type.
Product formulation
Body fillers vary considerably between brands and product lines.
Differences may include:
- Weight and density
- Spreadability
- Sanding characteristics
- Adhesion
- Working time
- Curing time
- Maximum recommended thickness
- Moisture resistance
- Reinforcement materials
- Surface compatibility
A lightweight product may be easier to spread and sand, while a reinforced product may be selected where additional strength or water resistance is required.
Intended repair
Different fillers are made for different kinds of work.
A standard or lightweight filler may be suitable for a shallow dent, while glazing putty is better suited to pinholes and fine sanding scratches. Fiberglass-reinforced or metal-reinforced fillers may be used for selected repairs that require a stronger compound.
The intended application matters more than whether the container carries the Bondo name.
Price and availability
Price can vary according to:
- Container size
- Product formulation
- Reinforcement materials
- Sanding characteristics
- Brand
- Quality level
- Intended application
A higher price does not automatically mean a product is right for every repair. A specialized filler may cost more because it is designed for a narrower purpose.
Ease of sanding and finishing
Some lightweight and premium fillers are formulated to spread more smoothly and sand more easily than denser general-purpose products.
An easier-sanding filler can reduce shaping time, but final results still depend heavily on preparation, mixing, application thickness, curing, and sanding technique.
Types of Body Filler
Understanding the main types of body filler can help you choose the correct product for the job.
| Filler type | Typical use |
| Standard body filler | Ordinary dents, low spots, and surface leveling |
| Lightweight body filler | Repairs where easier spreading and sanding are preferred |
| Fiberglass-reinforced filler | Selected repairs requiring added strength or moisture resistance |
| Metal-reinforced filler | Repairs requiring a stronger reinforced compound |
| Glazing or spot putty | Pinholes, sanding scratches, and final surface imperfections |
Standard body filler
Standard body filler is commonly used for ordinary dents, low areas, and general panel leveling.
It works best when the underlying panel has already been reshaped and the surface has been properly cleaned and prepared.
Lightweight body filler
Lightweight filler is designed to spread and sand more easily than some denser general-purpose products.
It is often useful for technicians and DIY users who want easier shaping and a smoother finishing process.
Fiberglass-reinforced filler
Fiberglass-reinforced filler contains reinforcing fibers and may be used where additional strength or water resistance is required.
It can be suitable for selected fiberglass repairs or as part of a properly prepared metal repair. Its use should always follow the manufacturer’s instructions.
Metal-reinforced filler
Metal-reinforced filler is designed for repairs that call for a stronger compound.
It should not be treated as a replacement for welding, panel replacement, or structural metal repair. Its purpose is still to support surface restoration within the limits specified by the manufacturer.
Glazing and spot putty
Glazing or spot putty is intended for very small imperfections, including:
- Pinholes
- Fine scratches
- Minor sanding marks
- Small surface defects remaining after the main filler work
It is generally applied during the finishing stage rather than used to fill a large dent.
Which Is Better for Your Repair?
The best choice depends on the type and extent of the damage.
Small dents and shallow low spots
For small dents and shallow low areas, a quality standard or lightweight automotive body filler is usually suitable.
Before applying it, reshape the metal as closely as possible to its original form. This reduces the amount of filler required and helps create a more durable repair.
Deep dents
A deep dent should not simply be packed with a thick layer of filler.
The metal should first be pulled, hammered, or reshaped using the appropriate auto body tools. Body filler can then be used to level the remaining low areas and refine the panel surface.
Pinholes and sanding scratches
Glazing putty or a finishing filler is the better choice for pinholes, fine scratches, and minor imperfections.
Using a heavy general-purpose filler for tiny surface defects can create unnecessary sanding work.
Fiberglass panels
For a fiberglass panel, use a product specifically stated to be compatible with fiberglass.
Depending on the damage, this may involve a fiberglass repair system or a suitable reinforced filler. Always follow the product instructions for preparation and application.
Rust damage
Ordinary filler should not be applied directly over active rust.
Rust should be removed, and severely weakened or perforated metal should be repaired or replaced before filler is used. Applying filler over corrosion may temporarily hide the damage, but it does not stop the underlying deterioration.
Cutting and grinding tools may be required when removing damaged metal. The guide on what a cut-off tool is and how it works provides additional information on this type of equipment.
Plastic bumper damage
Standard rigid body filler may not be suitable for flexible plastic bumpers because it may crack when the plastic moves.
A flexible plastic repair product designed for the specific bumper material may be required.
When Should You Not Use Body Filler?
Body filler is primarily a cosmetic shaping and finishing material. It should not be used as a substitute for proper structural repair.
Avoid using ordinary body filler in the following situations:
- Active rust is still present
- The metal is loose, flaking, or severely weakened
- The panel has structural damage
- A large hole has not been properly repaired
- The surface is oily, waxed, dusty, or contaminated
- Loose paint or coatings remain in the repair area
- The material is flexible and the filler is not compatible
- The required thickness exceeds the manufacturer’s limits
- The underlying dent has not been reshaped
- The surface is incompatible with the chosen formula
When a panel is badly corroded or damaged, welding, patching, panel replacement, or professional body repair may be required before filler is applied.
How to Apply Body Filler Correctly
A good filler repair depends on careful preparation and controlled application.
1. Inspect and repair the underlying damage
Begin by examining the panel carefully.
Determine whether the damage is cosmetic or structural. Reshape dents, remove corrosion, and repair holes or weakened metal before applying filler.
A body hammer and dolly can help bring the panel closer to its original shape. The less filler required, the easier it is to create a controlled repair.
2. Clean and prepare the surface
The repair area must be clean and stable.
Depending on the product instructions, remove:
- Paint where required
- Rust
- Grease
- Wax
- Dust
- Loose coatings
- Flaking material
- Previous failed repairs
Use an approved automotive cleaning product and allow the surface to dry fully before mixing the filler.
3. Mix the filler and hardener
Place only the amount of filler you can apply during the available working time onto a clean mixing board.
Add the specified amount of compatible hardener and mix according to the manufacturer’s ratio.
Fold and spread the components together until the color is uniform. Avoid aggressively whipping the mixture, as this may introduce air and contribute to pinholes.
Never return mixed filler to the original container.
4. Apply thin, controlled layers
Use a clean spreader to press the filler firmly into the prepared surface.
Apply it in controlled layers and feather the edges into the surrounding panel. Avoid trying to fill a deep area with one excessively thick application.
Where more material is needed, allow the previous application to cure according to the instructions before building the repair further.
5. Allow the filler to cure
Do not begin sanding before the filler has cured sufficiently.
Curing time varies according to:
- Product formula
- Amount of hardener
- Temperature
- Humidity
- Application thickness
Trying to sand too early can tear or distort the filler. Waiting too long may make initial shaping more difficult, depending on the product.
6. Shape and sand the repair
Begin with an appropriate abrasive for initial shaping and then move through progressively finer grits.
Use a sanding block where possible to keep the repair level and prevent finger grooves or uneven shaping. A dual-action sander can help on suitable areas, but careful block sanding is still important for checking the panel contour.
For broader repair and refinishing equipment, explore the Paint & Body category.
7. Apply finishing putty where needed
After shaping the main filler, inspect the surface for pinholes, fine scratches, and small imperfections.
Apply glazing or finishing putty where required, allow it to cure, and sand it smooth.
8. Prime and finish the panel
Body filler should not be left exposed.
Apply a compatible primer and complete the refinishing process according to the paint-system instructions. Primer helps protect the repair and provides a suitable surface for the final coating.
Tools and Supplies Needed
A typical body filler repair may require:
- Body filler and compatible hardener
- Clean mixing board
- Plastic or metal spreaders
- Sandpaper in several grits
- Sanding block
- Dual-action sander
- Body hammer and dolly
- Grinding or cut-off tools where appropriate
- Approved automotive cleaning solvent
- Dust mask or suitable respirator
- Safety glasses
- Protective gloves
- Primer
- Paint and finishing materials
Compressed-air tools may also be useful for sanding, grinding, and other shop tasks. Learn more about selecting and using an air impact wrench for automotive work.
Common Body Filler Mistakes
Even a good product can fail when it is applied incorrectly.
Applying filler over rust
Body filler does not stop corrosion. Active rust should be removed and weakened metal repaired before the surface is filled.
Using too much hardener
Excess hardener can shorten the working time and may affect how the filler cures and sands.
Always follow the stated mixing ratio.
Using too little hardener
Too little hardener may prevent the filler from curing properly, leaving it soft or unstable.
Mixing too much at once
Body filler usually has a limited working time after the hardener is added.
Mixing a large batch can cause the material to begin curing before it has been applied.
Applying filler too thickly
Thick applications can be difficult to shape and may hide the fact that the panel was not properly repaired.
Reshape the metal first and build the filler in controlled layers.
Failing to repair the dent first
Filler should refine the panel, not replace proper dent correction.
A deep dent packed with filler is more likely to produce an uneven or unreliable result.
Applying filler over contamination
Wax, oil, grease, moisture, dust, and loose coatings can interfere with adhesion.
Prepare the repair area thoroughly before application.
Sanding too early
Sanding before the filler has cured sufficiently can tear the material or pull it away from the surface.
Leaving pinholes before priming
Pinholes and small defects can remain visible through primer and paint.
Inspect the repair under good lighting and use finishing putty where required.
Using standard filler on flexible plastic
A rigid filler may crack when applied to a flexible bumper or plastic panel.
Use a compatible flexible repair compound instead.
Ignoring temperature and curing requirements
Working conditions affect mixing, curing, sanding, and adhesion.
Follow the product instructions regarding acceptable temperature, application thickness, and cure time.
Body Filler vs Bondo: Final Verdict
Bondo is not a separate material category from body filler. It is a well-known brand that sells several types of body filler and related repair compounds.
The best choice for your repair depends on:
- The type of damage
- The depth of the low area
- The panel material
- The amount of flexibility required
- The product’s formulation
- Its sanding characteristics
- The required finish
- The manufacturer’s application limits
For ordinary dents, a standard or lightweight filler may be suitable. Fiberglass-reinforced, metal-reinforced, flexible, and glazing products are intended for more specific applications.
Regardless of the brand, a lasting repair depends on correcting the underlying damage, preparing the surface properly, mixing the material accurately, applying controlled layers, sanding carefully, and protecting the finished repair with the correct primer and paint system.
Frequently Asked Questions
Is Bondo a type of body filler?
Yes. Bondo is a brand that offers automotive body filler and other repair materials. The term is also commonly used informally to describe body filler in general.
Is body filler stronger than Bondo?
Not necessarily. Strength depends on the specific products being compared. Standard, lightweight, fiberglass-reinforced, metal-reinforced, and finishing fillers are designed for different applications.
Can body filler be applied over paint?
The surface should be prepared according to the product manufacturer’s instructions. Applying filler over unsuitable paint, loose coatings, contamination, or corrosion can cause poor adhesion and eventual failure.
Can Bondo repair rust holes?
Ordinary body filler should not be used as a structural replacement for rusted metal. Corrosion should be removed, and the damaged area should be repaired or replaced before filler is used for final shaping.
How thick can body filler be applied?
The maximum recommended thickness depends on the specific product. The panel should first be reshaped, and filler should be applied in controlled layers within the manufacturer’s stated limits.
Is glazing putty the same as body filler?
No. Glazing putty is generally intended for pinholes, fine scratches, and small finishing imperfections. Standard body filler is used for larger dents and low areas.
Can body filler be used on plastic bumpers?
Only when the product is specifically compatible with the plastic and the required flexibility. Standard rigid body filler may crack when applied to a flexible bumper.
How long does body filler take to dry?
Curing time varies according to the product, mixing ratio, temperature, humidity, and application thickness. Follow the manufacturer’s stated working and curing times.
For more information on repair products used for joining, filling, and sealing, see this guide to sealing adhesives.